

So, I know this is an archery-focused site and you would not normally expect to read a review for a tent. However, I know several followers are also keen outdoors types or involved in scouting groups. For this reason I thought I would write this review of our experiences following us purchasing a budget tent (around £50) which we have been using for the past few months.
Those of you who are regular readers know that I tend to write reviews after I’ve tested things multiple times, over several weeks or months and sometimes to point of destruction. This is no different.
The tent was bought on a whim when visiting a local Go Outdoors store. Sharon was after a tent for the scout camps she was organising and we saw this one whilst looking at others. We were also after one for the garden as a part play tent, part introduction to camping.
So here are some basics, the Tamar 2 weighs 2.73 kg, and the internal sleeping compartment is 1 metre in height 210 cm in length x 150 cm wide for the full dimensions please check out the image below. So it is not a huge tent and for the price not overly heavy.

We initially thought the tent would be up for a couple of weeks, in reality, it was up from late June to the first week of September. We would spend several nights over these weeks enjoying the outside. It was a bit of a cheat for us as it provided the opportunity to introduce the idea of overnight camping while still being close to home.
The tent is advertised as a two-man and you can get two people in it. Just be aware that there isn’t lots of space inside if you each have a backpack. We discovered on later camping nights that you could fit a Eurohike double airbed in it, though it doesn’t leave any spare space. So if you are thinking of using it for backpacking, you can probably get away with it but I don’t think there is a large amount of storage space for backpacks etc If it’s just you then no worries.

Unlike some other tents, this has an outer layer to which you can pitch initially and then the inner sleeping compartment is attached. This is useful as it provides you with some shelter from the elements. There are two bright yellow guylines on each side to secure it down.
The entrance is a double zip style offering easy access and has a small storm area, large enough to store your boots but again space is limited. Could probably fit a backpack. The inner tent does open fully but it’s not like other tents with double zip.
So there are a couple of things I did to improve the tent.
As soon as it was up I waterproofed it with Nikwax waterproofing. It is rated at HH2000
Since the tent was going to be up for a few weeks I put some corflute plastic sheeting under it. It’s normally used to protect floors and I have found it works pretty well under a tent to help act as a barrier. A barrier not just for moisture but also to protect the sewn-in groundsheet from any sharp stones or twigs, that might otherwise puncture it.

On top of these mats, I added 6 foam sheets shown in the picture. They are the sort used for play areas and the advantage these have is there are holes in them so it allows moisture to run away and not pool on top.

An important tip here is to make sure that any mat you put down is smaller than the tent’s footprint. this may initially sound strange but if you think about it for a moment it makes sense. if it was larger then it would jut out under the tent and potentially catch any rainwater flowing off the tent. By having it smaller it means it doesn’t catch the runoff and feed it under the tent.
For some extra protection , I threw a 3 x 2-metre tarpaulin over the top of the tent, partly to protect it from the wood pigeons defecating on the tent. It was erected under a tree to offer some shelter and shade. The Tarpaulin also offer an extra layer of waterproofing, as I wasn’t sure how good it would be. This had both an upside and a downside. The upside was it made the interior of the tent darker, so offering the occupiers more shelter from early morning sunlight, the downside was it reduced some of the airflows. The is something to consider that air flows not great, with a small top vent and one onside.
This summer has been warm and largely dry, though we have had some rain and the tents remained totally dry inside, which is good news
The tent poles ended up being a bit rusty on the ends and in fairness I’m not surprised as they were out in contact with the earth for several weeks. this was quickly resolved with the use of some wire wool.

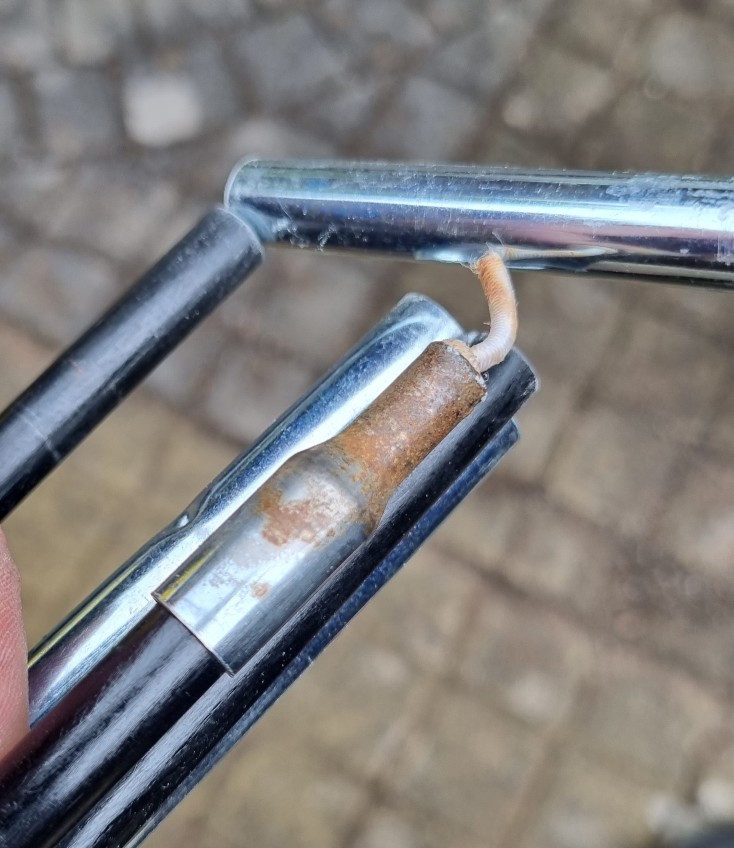
The tent has only two fibreglass poles making it pretty easy to erect the outer first and then the inner main part of the tent can be clipped in place.
Being an inexpensive tent it is plagued with cheaper tent pegs which wasn’t a problem for us, but something you might want to consider replacing. Having said that the groundsheet is pretty good and would be easy to patch if needs be.

More amazing though, was when it came to finally taking it down and packing it away. I managed to easily fit it all into the bag it came in. Yes, I know, I was shocked too.

So overall, for an inexpensive tent it works pretty well. I do think we were fortunate with both the weather and location but if you are looking for an occasional tent for the odd night away and don’t want to break the bank, it’s okay. Might be good for a festival or occasional scout camp. It could prove a good introduction to camping. So for under £50, I think it is good value for you money.
Thanks for reading.

