Injury and archery

I’m sure many reading this have seen photos of injuries associated with archery. Some of you may have been injured yourself or patched people up.

Sharon recently injured her right hand in a bicycling accident. On further investigation at hospital it transpired she had fractured her ring finger either side of the first joint.

Sharons hand

Sharons’ hand, the swelling and bruising has gone down.

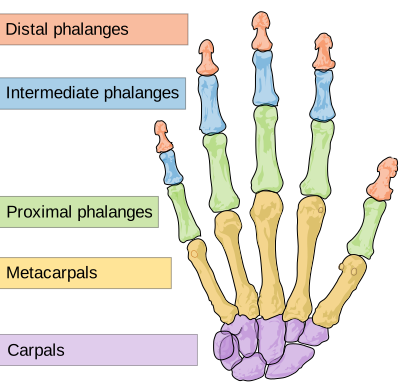
For those of you with medical knowledge it is the intermediate phalanges and proximal phalanges  which I think is the metacarphalangeal joint.
Though this is a minor injury. The bone is not broken all the way across, but is broken in 2 places, it will result in no shooting for minimum 4-6 weeks as the bones knit back together. She is not a happy archer and keeps hinting at stringing bow in couple of weeks. To which she gets a stern telling off.

  • Don’t rush back and expect to perform at same level.
  • Give your body time to heal – rushing back to shoot may result in complicating your injury

Putting pressure on healing limbs or muscles is BAD idea. Consider this. When you draw up you are putting pressure on your 3 fingers. Depending on your personal draw and technique you might exert slightly more pressure on say your ring finger than your index or vice-versa. Either way, if one is injured you must give time for your body to heal.

Sharon Shooting

Sharon Shooting a few weeks ago

I presently have a not very happy archer, but I would rather a not very happy archer for a couple of weeks than an injured archer for a few months.

Thanks for reading

How to measure your draw length?

I’ve had a couple of people ask about how you measure your draw length and what length to make arrows?

There are a couple of ways of measuring draw length, I know Jordan Sequillion has posted a method on her site. The one I feel works best is using a measuring stick or measuring arrow.

You can buy them from most archery suppliers but I made mine. In essence, mine is an unused arrow shaft which I have glued a nock in one end and then marked up in one inch intervals. To make it easier to read I’ve painted the increments in contrasting colours.

Measuring Arrow

Homemade Measuring Arrow

Get the archer to draw up 3-4 times and then coming down obviously without releasing the measuring arrow. (make sure they are in a safe environment so on the range pointing towards the target boss just encased they accidentally release)

Full Draw

Archer at Full Draw

Ensure they are drawing to their normal anchor point each time, this way you can ensure the measurement is correct.

You can then see easily what there draw length is and the technique can be used for all pretty much all styles of bow, though please be careful when trying this with a compound bow, since it is easy to release the measuring arrow when you come down from full draw.

Here is a couple of additional tips.

Camera Phone – Use your camera phone to capture a couple of images of them at full draw. This will make easier to check the measuring later.

Rubber band or Tape – If you don’t have a camera to hand try using a piece of tape or rubber band at what you think is their draw and then have them draw up a couple more times. This way you can see if it is in the right spot.

If they are a beginner add another inch on as shown in this photograph below.

Measuring Arrow

White tape shows potential arrow length

I tend to recommend a slightly longer arrow if shooting woods and field archery. simply as in winter months you might be wearing a glove on bow arm and it gives you a little more clearance. Also should you lose the pile or snap the tip-off you might be able to taper the end back down and still have a usable arrow.

For competition I tend to cut them exact leaving no “spare”, if I lose the tip the arrow is added to the wood pile for the fire 😦

The other useful thing with using this method is spotting archers who either overdraw or overdraw and then collapse slightly. But I’ll cover this in more detail in my next posting.

Thanks for reading, any questions let me know.

Literature review – Shooting the Stickbow

Shooting the Stickbow

Finally got round to writing another one of these literature reviews, sorry for the delay. So this one will be on

Fellow archer and blogger (Charles’ Archery blog) has written a great review of this book too and you can find it here.

So why did I go for this book over others?

I bought this book following a recommendation from a fellow archer (Chris Smith) He had been lent a copy and had said how informative he found it. Chris is also a NFAS coach and we had both been reviewing different books for coaching tips and as a good all round resource. This book ticks many of these boxes.

It is a very comprehensive guide for archers, covering the basic very well, more importantly you will find it an easy read, not too technical or complex. On this point I would say it is more technical than many of my other reads, but it is still an easy read. It covers the basics well and what any archer needs to know to progress.

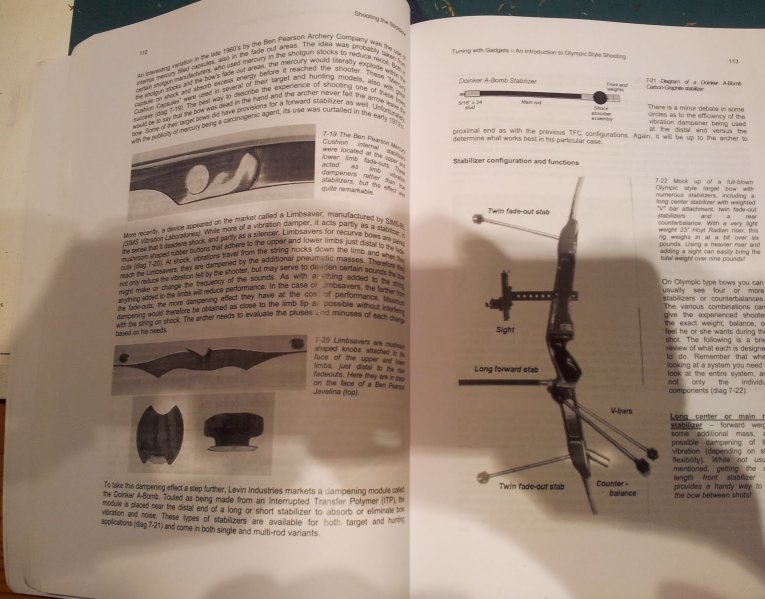
Shooting the stickbow - internal pages

Shooting the stickbow – internal pages

In short I think what makes it a good read is its chapter structure. It  enables you to pick up a copy and read a chapter or two and get something worth while out of it. So if you have a busy life style and find the time very limited it is ideal.

the book  is broken into 4 sections

  • Basic Shooting the Stickbow
  • Equipment – a detailed view
  • Making the shot – theories and practice
  • Memories and musings

Think it maybe of limited use for compound archers as it is aimed at those archers shooting recurve and afb, but I guess the clue is in the title “shooting the stick bow”. I’ve shown this to a number of other archers and everyone whether shooting barebow or longbow have found it of interest. I’ve also recommended it to anyone thinking of either becoming a coach or simply want to expand their knowledge.

Shooting the stickbow - internal pages

Shooting the stickbow – internal pages

Unlike some archery books I have which are pocket-size this is more of a tome, providing a wealth of information, experience and advice. I think it is a massive achievement of the author to produce such a weighty read but still make it easy to follow. The only downside I can give on the book is the quality of some of the photographs that are “showing their age”. Otherwise I would say its a 9 out of 10.

Here are the ISBN number etc I bought my copy from Amazon and received it within a couple of days.

Shooting the Stickbow” 2nd Edition, by Anthony Camera

Author : Anthony Camera
Paperback: 438 pages
Publisher: Virtualbookworm.com Publishing (13 Oct 2008)
Language: English
ISBN-10: 1602642443
ISBN-13: 978-1602642447

Thanks for reading and hope you find this of use.