Bison target face

New NFAS Target Faces review

The number of different target faces for field archery courses is quite simply astounding, probably numbering in the hundreds when you consider the different suppliers. I’m not talking about the round ones of different sizes and colours, but those depicting animal targets. So the JVD, Merlin, Delta etc. Over the last 12 months the National Field Archery Society, here in the UK has designed and produced a series of its own target faces to fit their needs.

These new faces were designed from the outset to be suitable for the NFAS championships and available for clubs to buy. The results of all this hard work being a collection of 80 custom faces, across 4 size groups giving organisers 20 target faces in each size group to choose from.

These faces can be printed on either paper or a plastic like mesh, (more on the mesh later) depending on the clubs requirements. The target faces have been designed with individual scoring zones ideal for NFAS competitions covering wound, kill and inner kill.

Explanation of Scoring zones

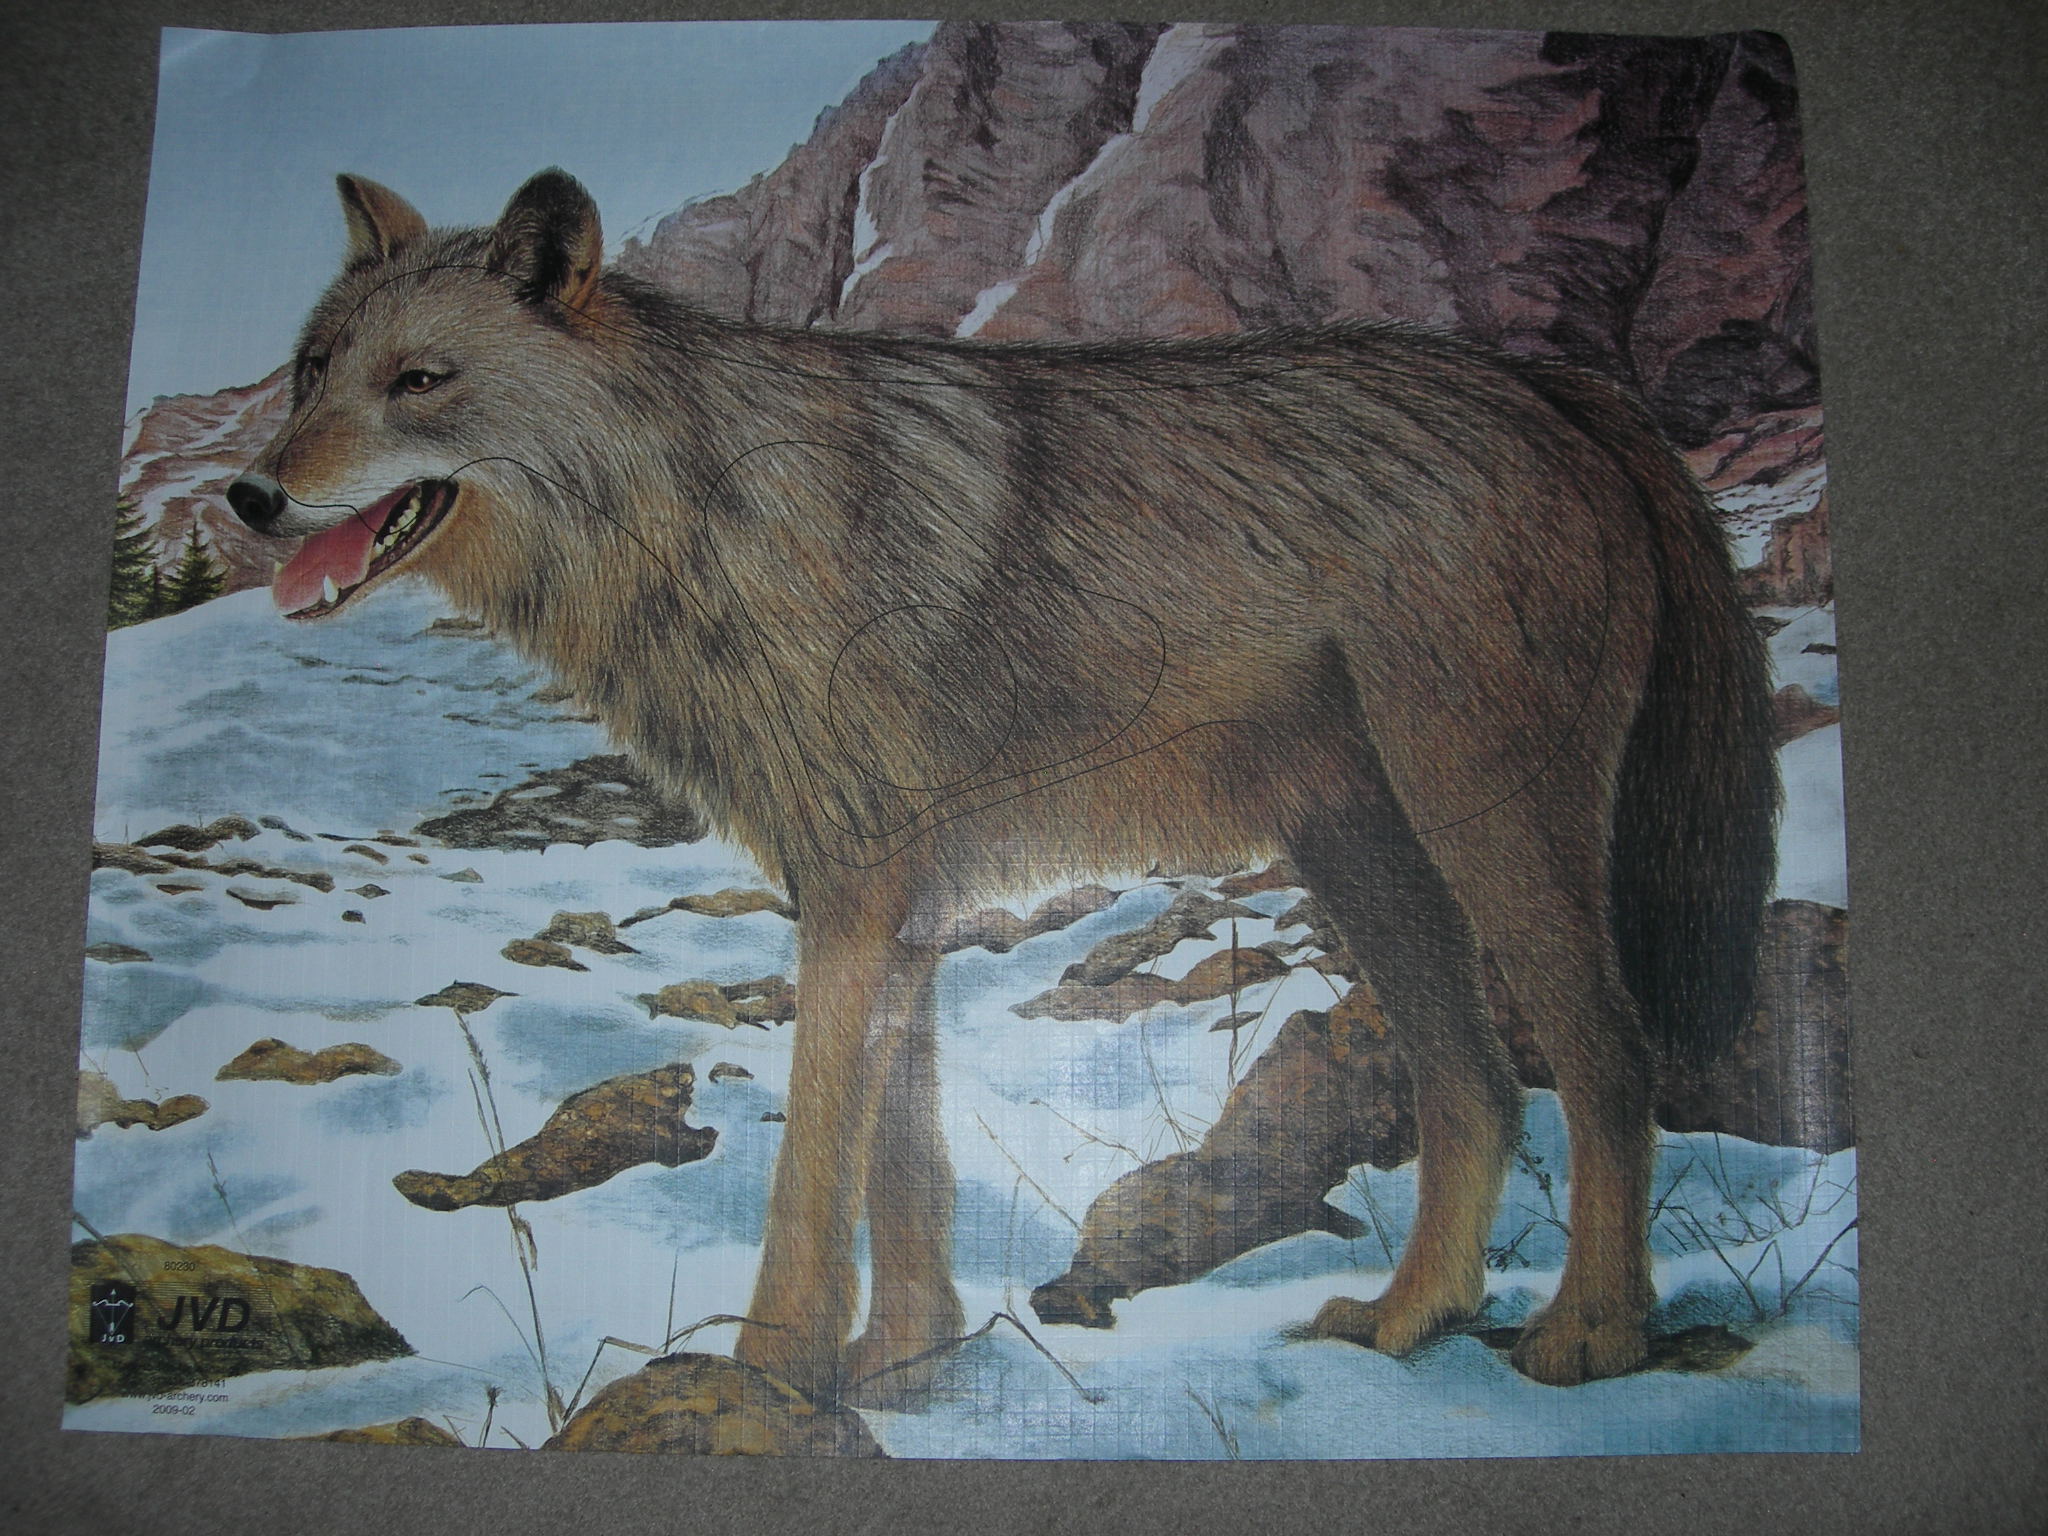
It’s worth noting NFAS made the decision when creating these faces that they wanted to make the scorings zones in some ways generous whilst still being challenging. The result was a series of target faces where the wound lines are running round the edge of the animal, thereby making the possibility of scoring a wound significantly easier than with other faces, This means not only the head and body area scores but also the legs, something very different to many other target faces currently on the market. Having said this the kill and especially the inner kill is small, making it challenging to get an inner kill,

At this point it might be worth explaining how the most common NFAS field course round – The Big Game round is scored. Everything is shot over unmarked distances and no range finding equipment is allowed. The goal for all archers is to go round and hit the target with their first arrow. Something I have never achieved. Courses are usually 36 or 40 targets set at distances from 5 yards to 70 plus yards. Yes, I did say 5 yards. Courses are set mostly in woodland and unlike other societies who insist on clear shooting lanes NFAS course layers will use all the vegetation and terrain to disguise the distances and make for a challenging shot.

The shooting distances are the same for all genders, the only difference being the age of the archer. younger archers shoot from junior pegs. This means you could have a compound archer shooting from the same peg as a longbow or Olympic recurve.

When you hit, what you score is dependent on which arrow you first hit with. Therefore if you hit the target with

  • First arrow wound is 16 points a kill 20 points inner kill 24 points, if you miss you go again.
  • Second arrow wound is 10 points a kill 14 points inner kill 14 points, if you miss you go again.
  • Third arrow wound is 4 points a kill 8 points inner kill 8 points. If you miss with your third attempt then you blank the target and move on.
    The inner kill area only bestowing a bonus score on the first shot, after that point it scores the same as the kill zone.

On a personal note I would like to see the faces organised in a northern / southern hemisphere . This simple is because I prefer seeing target faces in woodlands I could imagine being present historically in the country. So wolves, bears, deer, etc I’m not a fan of a lion, zebra or hippo. This is an entirely personal point of view.

The faces can be bought from the NFAS website https://nfas.net/

To give you an idea of the cost a group 1 target, printed on the mesh is £9.76 and a group 2 is £8.66 (this is at December 2022)

The testing of the mesh

Over the past few months the field Archery club (Briar Rose Field Archers) I belong to have had some of these new NFAS target faces out in our woodland course, as well as using them for the open competition a few months ago.

The bison shown below has been out since our clubs open shoot and lasted really well. The target is on a 1300 mm x 1300 mm boss so you can get an idea of size.

Bison target face
Bison target face

To give you an idea of what the target looks like from the shooting peg, I’ve taken the photo below. On the day of the shoot we had to fit a catching net at the back of the target due to so many people misjudging the distances. It is actually under 40 yard shot.

Bison target from shooting pegs

These target faces are printed not on paper but a plastic mess, which according to NFAS website can last several months or even a couple of years. It has certainly lasted a couple of months so far.

Image of the ostrich target face

There has been a few discussions about the line colours being a little hard to see at a distance or the contrast being a little unclear on some faces.

The mesh has proved to be a lot more resistant to the wet weather we’ve been experiencing. Unlike some printed faces these mesh ones don’t seem to be eaten by slugs and snails. A big problem with some of the old JVD faces which when they get wet seem to disappear due to slugs and snails almost overnight.

I’m reviewing the mess faces here, but you can order them printed on paper if you rather. Below you can see a closeup of the target face, showing the holes in the mesh. This highlights the only drawback with the target face we’ve found. Our experience has shown that the weave closes up pretty well for most arrows but some wooden arrows where the pile can sometimes snag when the arrow is drawn out. This can create a slightly larger hole, which is visible in the photo below. It;s not for all wooden arrows just those where there is almost a groove behind the pile, so not quite flush to the shaft.

close up of target face
Close up of target face

I’ve recorded a couple YouTube videos available on my channel, showing a couple of the target faces we have been using at the wood.

One tip I’d like to offer anyone considering using these faces, is covering the target bosses with black fabric. This may sound a little strange, but consider this. Many target bosses are made up of layered foam, sometimes of different colours. By wrapping or covering the bosses you don’t see the different colours and said bosses are less visually intrusive in the woods. It also means when holes are made in the target face the brightly coloured foam is not visible. To keep costs down we use the weed suppressing material available online or from garden centres.

So are they worth the money?

At a time where every penny counts this is of vital importance for many clubs and individuals alike. I don’t think the mesh is worth it for small target faces (group 4) as I think they would be shot out too quickly. For our club where paper faces are likely to be eaten by slugs and snails, before they are shot out. Then yes there is a benefit. If you are looking for a target faces that is weather resistant and look good then they work well. I’ll freely admit that I was a bit skeptical originally largely due to the costs and concerns on how long they last but they have lasted well and still going.

It’s also nice to see some new faces, with very friendly wound lines. It might encourage more clubs to use paper faces. I think the 24 are small and could do with being a little larger. I don’t know if NFAS are going to add more faces over time, but that I think would be great idea.

Thanks for reading.

image of Archer arrow speed check at recent shoot

Bow speed checks

At our recent club shoot (Briar Rose Field Archers) in July, we made the decision that we wanted to run speed checks on compound bows and crossbows, so we set up the club chrono.

For those of you unfamiliar with a chrono, it measures the speed of an arrow and under the NFAS the maximum speed allowed is 300 FPS (feet per second) as per the shooting rules. There is a 3% allowance for variance in chronograph equipment being used. This means a bow reading 309 FPS is still legal.

The chrono has a sensor at either end between metal V rods that are used to offer a guide to the archer as to where to shoot. The archer shoots over the top of the chrono, crossing the 2 sensors between the two V with their arrows. The archers shoot a few feet from the chrono into a boss as shown in the picture below, where you can see the chrono mounted on a tripod and the target boss beyond. It’s important that the chrono is set up level and there is sufficient light for the sensors to register the arrow passing above.

image of Archer arrow speed check at recent shoot
Archer arrow speed check at recent shoot

Anyone over the speed limit would be asked to slow the bow down or not be allowed to shoot.

There were a few interesting observations

  • All compounds and crossbows we tested were legal i.e. speed less than 300 fps.
  • The reaction and feedback from the attending archers were very positive, not just from those who were shooting compound or crossbows, but traditional archers shooting recurves or longbows. These were curious to see what speed their bows were producing.
  • It generated lots of discussion with some about how they might increase their speed. How the weight of arrows affects speed. How shooting light arrows increases speed but can damage bows and so on.
  • Several had never seen or were even aware of what a chrono is or why it’s important. Possible because they were shooting styles other than compound or crossbow.

The latter point is worth revisiting as unless you frequent national championships or 3Ds it’s unlikely you will have encountered one. Few clubs have them or if they do I haven’t seen them often at shoots. This raises the question of whether there are bows out there being shot that are exceeding the speed limits through no fault of the archers.

For those interested you can see the results of the Briar Rose shoot on the club website. Also wanted to say a special thanks to Rich Clarke who manned the chrono. You might know Rich from Archery Geek outdoors Podcasts.

Anyway, thanks for reading.

Course laying – consider target faces

In the previous post I wrote of the importance of feedback to course layers. In this post, I’m looking at some of the preparations that an event organising team should consider. These being both in time and the expenditure clubs have to fork out in advance before the event when it comes to target faces, 3Ds, shooting pegs, etc.
I think a logical way to begin is with a few questions, based on whether a club has the necessary stores to host an event. This is even more important for newly formed clubs or a small clubs that have fewer funds to draw on and resources to draw on. So here goes with a simple question, or do you have enough…

  • Have you got enough target faces for the course? Remember you are going to need spares and replacements.
  • What about shooting pegs? Do sufficient in the right colours for all the shots?
  • Do you need to repair/replace any target bosses?
  • Are there enough scorecards for all attendees?
  • What about your 3Ds doe they need repair or replacement? Have you got enough securing pins?

The above is just a brief list, which can go on and on. So, I’m going to explore a single element in more detail, that of target faces and the preparation of these.

The Prep

Long before the day or even the weekend of the event, there is work going on at the hosting club and club members homes.
Some of you may be familiar with the work in setting the course out, clearing paths, staking target bosses, etc. Away from these physical aspects of the course laying process, there is the planning for what faces are required? Where to source them from? Whether they are in stock or not at your preferred suppliers?.
To give you an idea, we had to paste up over 70 target faces for our shoot ranging from small ones (group 4 ) to large ones that just fit on a 1300 mm square boss.
This was for only 24 targets out of the 36 targets on the course in question, the others would be 2D or 3D targets. So why did we need so many? I will cover that a little later.

The club was hosting an NFAS open shoot, which means all targets were set on unmarked distances, ranging from 6 yards to over 50 yards. It would be a big game round, so all targets would be animal paper faces, 2D or 3D targets.

Pasting up

Mounting the target faces in itself takes time and ideally good weather; read warm, dry weather. We paste all the faces onto corrugated cardboard, so they last longer. We also paste an extra piece of card behind the highest scoring area as this tends to prolong the life of the target.

Card on the back

This means the first hurdle is sourcing sufficient cardboard to mount the target faces, which can be an uphill struggle in itself when you think of the sizes of some of the larger target faces. For our last shoot, we were very fortunate. You could say we hit gold twice thanks to a local Halfords branch and a couple of club members who secured loads. We’ve tried lots of different glues and found Hobbycraft PVA to be the most cost-effective if doing small numbers. The other alternative is to use diluted builders sealant PVA. You really need to factor in the time it takes to do this too.

Not only are you sorting suitable size cards, glueing the faces to the card. You have to trim the card down afterwards. Sort them to ensure you have the right ones for the right targets. This is where getting club members involved and helping can make a huge difference. We were very fortunate to have some great volunteers in the club who came around for several days.

How many faces are needed?

Scoring faces that are severely damaged by other archers arrows or have deteriorated to mush due to wet weather is not easy or fun. So to be fair to all competitors, you want to provide decent target faces that are easy to score.
Add to this that small faces get shot out quicker due to the very nature of numerous arrows impacting into a small space.
Wet weather and paper faces don’t mix. Carboard becomes sodden, ripping easily, glue gives up its adhesive properties, and so on. All this means you will need to replace them more regularly. Much as you hope for dry weather, you have to plan for all eventualities. This means for a shot that would be a group 4 target face, we wanted 6 to 8 copies. That may sound a lot but think of it this way. We capped the numbers of archers at 120 competing, all shooting at least 1 arrow, often 2 for some faces means probably 120 to 180 arrows. Divide 180 by 6 and you get 20 arrows into a small piece of paper. Factor in possible wet weather and the effect this has on paper. You begin to realise why you need multiple copies
For group 1 faces (the largest), we ensured we had a spare on the day.

JVD Red Squirrel target face

Spares were stored either in bin bags behind the target bosses to keep them dry or back at the admin hut, so they were there when required.

One quick tip or advice I would offer is if the budget for the event can afford it, buy a few spare different target faces of the different group sizes. It means on the setup day, usually the day before the shoot, you can tweak shots. You might find a JVD wolf would look better than, say a Delta ram on a particular target. One thing to remember is, that setting a shot that looks good, adds to the enjoyment for the competitors.

Wolf picture

So that I hope provides you with an insight into the preparation and time required when it comes to target faces.
In the following article, I’ll look at some of the physical aspects and considerations in respect to shooting peg positions to allow with all bow styles.
In the meantime, please keep safe and well. Thanks for reading.