Setting up a target boss – revisited

With recent worldwide developments concerning COVID-19 seeing more and people self isolating, working from home or simply having a lot more spare time on their hands, there has been quite a lot of posts on Facebook and other sites about home ranges, or practising at home.

I am going to highlight a few things you might need to consider. I am no expert and this is by no means a definitive list, but more of a starting point of things for you to consider.

  • What are you going to shoot at? What type of target or target boss? Will it be sturdy enough to stop your arrows at close range? Check out What target is best for me?
  • Can you safely shoot in your garden without endangering yourself or others? Think of pets, child, wildlife or even surrounding livestock? Consider also garden sheds, greenhouse and garages.
  • What of overshoots into neighbouring gardens, farmers fields etc?
  • Do you have insurance if anything goes wrong? Chances are your house insurance won’t cover you and you may have to take out some form of specific insurance.

Location, location, location

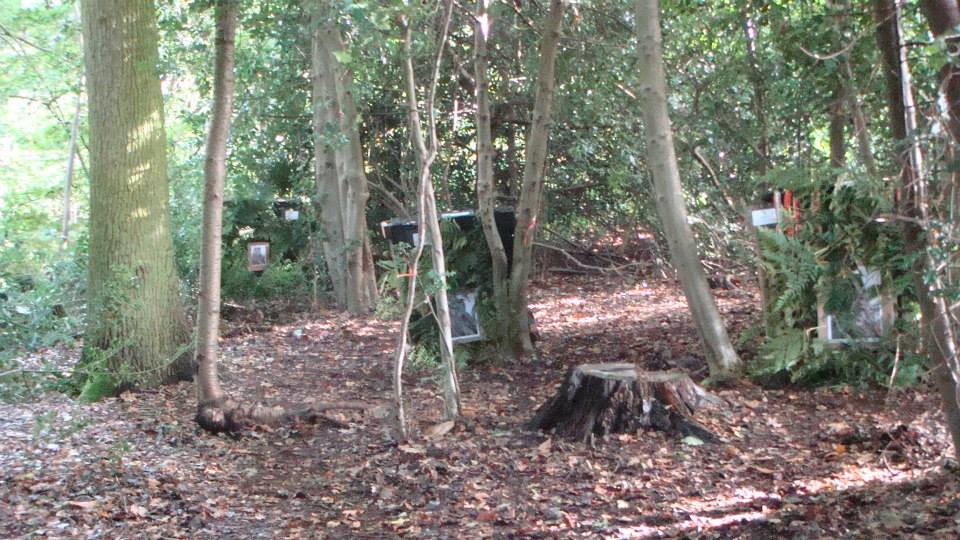
No I’m not talking about the TV property program commonly seen in the UK, but the physical location of your target boss. Look at the space surrounding the boss in the image below. What do you see?

Target Boss

Firstly there appears to be a stile behind and to the right of the boss. Does this mean there is a footpath behind the gate and we are likely to see people walking past?

What about the space behind the boss with regards to overshoot? Do you need to have something that will catch and stop a stray arrow? A safe over shoot area is vital for any target positioning. The metal gate seen behind this boss is also a risk. If an arrow misses the boss and hits the gate it is likely to deflect in any direction.

Did you spot the wall of the building to the left side of the target? You wouldn’t be able to see people approaching from that direction.

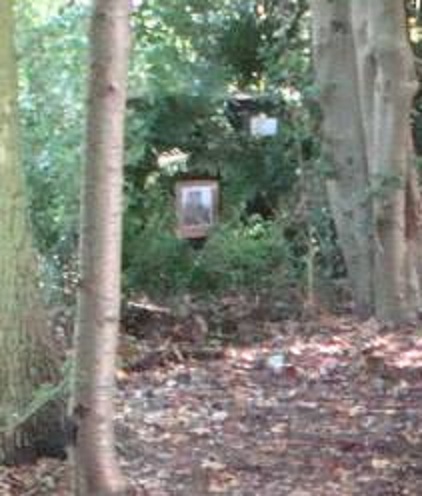
Securing the boss to the stakes is vital to ensure it doesn’t topple over when arrows are removed. It is worth considering whether the stakes need to be proud of the boss, unlike the image below. Also try to put them to the side or rear of the boss frame so as to avoid or limit the number of arrows hitting them.

One quick cautionary tale of a friend who set up a target boss in his garden. Unfortunately it was quite an old target boss and the arrow went through it, through the wooden shed wall behind and straight into his lawnmower! He wasn’t allowed to practise at home anymore.

Those are a few thoughts and topics to consider when positioning practise bosses. Have you got any further advice? If so why not add a comment below. Lets look at the orientation and securing of the target boss now.

Securing the boss

Setting up a boss is a common activity, but does require some thought and care to ensure it is done both correctly and safely, whether this be on an archery course or as in this example in the garden for a home practice range. Here you can see a boss having been erected ready for practise. Looks good? Can you spot any issues?closeup

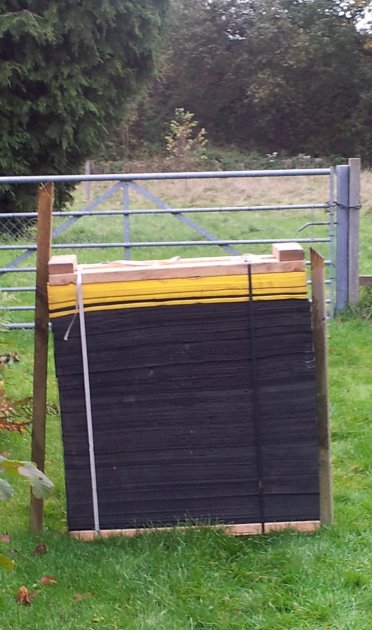
Well one commonly made mistake when setting up a boss of this nature is forgetting to check where the metal binding for the plastic strapping is located. These should always be on the back of the boss and never facing the direction of the shot.

Why? The binding clips used for banding can damage arrow tips if they are hit. I have also seen arrows shot from a compound bow hit one of these metal fastenings and bounce straight back some 15 yards, landing at the archers feet.

You should also ensure the wood frame of the boss is always to the side and not on top or bottom.

Why? If the arrow falls low, it will run the risk of hitting and embedding itself in the wooden frame, which is likely to  result in some work to extract. If the arrow impacts at the top of the boss it runs the risk of deflecting off in any direction . So rotate the boss to ensure the wood frames are on the side of the boss.

Target Boss

Insurance

Give some serious consideration when it comes to insurance. Some people believe that being members of a national archery society or club gives them cover to shoot at home, which isn’t necessarily true. I know this is something that has come up on the National Field Archery Society Facebook group and I expect it the subject has been raised on other sites too.

We have our own personal insurance that covers Sharon and myself when shooting on our home range, which we got through Gunplan (https://www.gunplan.co.uk/) . The field is also registered as one of the clubs sites as we use it for training sessions.

N.B. The target boss doesn’t normally sit there, it was simply positioned there for the photos for this post. It’s normally in the field beyond the gate. We are fortunate in owning the field at the rear of the property and know there is no public access or routes to it other than via our boundary. We have set up a 40 yard pegged range, with a 60ft over shoot before a backstop of old carpets at the fence line and then  30ft high earth embankment beyond.

I hope you find this article of interest and if you have any comments let me know. I’m putting a brief one together on the use of backstop nets too, when I get the chance. Thanks for reading and stay safe everyone.

Course and Target laying – So What makes a shot challenging?

My personal view is there are several ways in which you can make a shot challenging. Instinctively you will sometimes see how the land and vegetation can combine to make a good shot. But that doesn’t make it very easy to explain here or to new course layers developing their skills.
The art is combining one or two of them together to make a shot challenging without being too hard. In essence there is a fine balance between challenging and demoralising and as a course layer you need to judge this carefully.
In the next few posts I will look at different options from target distance to size of target, intervening terrain to footing on the peg.
First off though I’m going to give some comments on elevation.

So what do I  mean by elevation?

Any shot that is not along flat ground and requires you to change your stance or aiming because it is down a hillside or hung in a tree.
Shooting along the flat is one thing but in field archery you have the opportunity depending on terrain to introduce a shot that goes down or uphill and it confuses people. Shots across the slope also increase difficulty as you have to judge the angle and distance to the target.
An example of this can be seen here, where it looks a straight shot up a hill to a target by the tree.
View from the red peg

View from the red peg

This isn’t a straight up hill shot though, but one at about a 30 degree angle across the slope.
Arrows shows the target

Arrows shows the target

Though it doesn’t look it, it is a largish paper target of a Ram too from the Merlin archery  range of faces, shown below. Many archers will judge the distance but not necessarily the elevation. When setting this shot we decided that a paper face mounted on a target boss was better than a 3D target.  Why, I hear you ask?
We thought that a boss would mean people would find arrows more easily rather than them skipping along the ground, also a target boss deceases the chance of an arrow skipping off the top of the target and traveling on.
target face - merlin ram

Merlin Ram

Raising a target can also work as was the case in the tree shot. You will notice we have put a lower target in for juniors.

Elevated shot for adults

Elevated shot for adults

This isn’t a long shot, being approximately 7-9 yards, but because of its elevation in a tree it often throws peoples judgement.
I hope these ideas help and generate some ideas of your own. Have a walk round your wood this weekend and see if you can apply any of these ideas. If so then let me know, via the the message for Rob.
As always thanks for reading.

Course & target laying – A different kind of shot

A different kind of shot

A different kind of shot

At a recent shoot the club hosted I came up with the idea of a different kind of shot to the traditional one. The idea was to give them something a little different and give the archer a choice.

There would be 3 targets, not the customarily one, with each target being set up at varying distances ranging from 18 yards down  to 9 yards. On each target boss I placed the same target face a picture of an owl I had taken a few years back, but with one crucial difference. The nearest was A3 in size (A3 =  280mm × 420mm)  the middle A4 (A4 = 210mm × 280mm) and the furthest A5 (A5 =  140mm × 210mm).

A scoring line was drawn just inside the animal but I didn’t bother with any inner markings as all they had to do was be within the line. This is the image I used. I didn’t want to use a face that people had seen before.

Target

Target face

Archers were told they were allowed only one arrow and had to choose which target they wanted to go for.

If they made the shot and hit within the line, they scored otherwise it would be a blank on their score card. They would not be allowed to shoot a second if they missed first time or third arrow if they missed on their second attempt.

The closest and largest target (A)would score them 16 points (the normal score for a first arrow outer or wound hit) the smallest (C) and furthest would score 24 points ( inner bull often described as either pro ring or inner kill) and the medium sized middle (B)  one 20 points (outer bull or outer kill).

Targets A & B were across clear ground allowing archers to judge the distance more easily, also target A & B had been positioned with little difference in the distance. This was deliberate as I wanted to encourage the slightly less confident archer to had a go and be rewarded with 20 points.   To make target C a little more challenging I tied some holly bush bows down a few feet in-front of the boss so it was harder to judge the distance.

Close up of Target C

Close up of Target C

All target bosses were covered in greenery to camouflage them.

So the archer could go for an easy 16 points or challenge themselves if they felt confident, it was their choice.

Archers reaction

It was interesting to observe the archers on the day trying to way up which to go for.

  • Many archers went for the easy 16 points, happy with just not blanking the target.
  • Many of the sighted archers went for the 24 thinking they had too to keep their score up, the result being some missed.
  • The remaining went for the 20 points (middle size target B).
  • The holly bush trick on Target C worked, as a few archers commented they thought it was closer or further than the target actually was.
  • Interestingly there  were those who said I’ll go for what they perceived as an easy shot. Either target A or B, only to miss  possibly due to lack of concentration?
  • Many archers selected their target, shooting it and because there wasn’t any queues of people waiting asked if it was okay to have a pop at the harder shot for fun.
  • Lastly I noticed lots of smiling faces and a few people have commented on it to be since the shoot.

Conclusion

As I said earlier the idea was to give them something a little different. This worked with a number of archers speaking to me afterwards about the shot and how they liked it. Importantly it didn’t slow the shoot down which had been a concern, in fact I would say the opposite as it was one of the quickest targets on the day with no waiting. People seemed to enjoy the difference.

One thing I would add is the importance of having clear instructions. For those interested these are the instructions we used to explain the shot to archers on the day. We laminated a couple of copies, attaching them to trees near the shooting peg for archers to read before taking the shot.

You only shoot 1 arrow.
No 2nd or 3rd arrows are shot.
If you hit anywhere within the scoring area of the animal you score points shown below otherwise you blank.
Choose target A, B or C.
If you hit your chosen target with your one arrow you score
16 points for hitting target A or blank if you miss.
20 points for hitting target B or blank if you miss.
24 points for hitting target C or blank if you miss.
No hit. No score.
No 2nd or 3rd arrows are shot.
Choose carefully and Good luck.

Future Posts

In the next few posts I will be looking at course laying and the factors as I see them that make a good shot and a great shot. Trying to give advice, thoughts and ideas. If you have any thoughts or comments please let me know.

As always thanks for reading.