Tip for when using your bow stringer

This is a quick tip which came about from a coaching session last weekend.
Saturday I was working with some new archers, who were very keen to try out their brand new bows. There is always something special about having you own bow, doubly so when it is your first one. They had bought bows, arrows, quivers everything they needed and were assembling the bows ready to hit the range. The only problem was their stringers kept slipping on the upper limbs.
This is something I have seen loads of times before and is a common problem especially if the bows are at all wet or the archer is less experienced in stringing bows. The archers put the stringer pocket on the lower limb and loop on the top one, go to stand on the loop and lift the bow. The problem is the loop on the upper limb slips down towards the centre of the bow.
Most stringers have a leather or rubber section in the upper loop to grip the bow limb, but I’ve noticed that they aren’t always that good. This is true of whether they are string or nylon webbing sort. Some just don’t offer that much of a grip to the bow, being either too small or smooth.
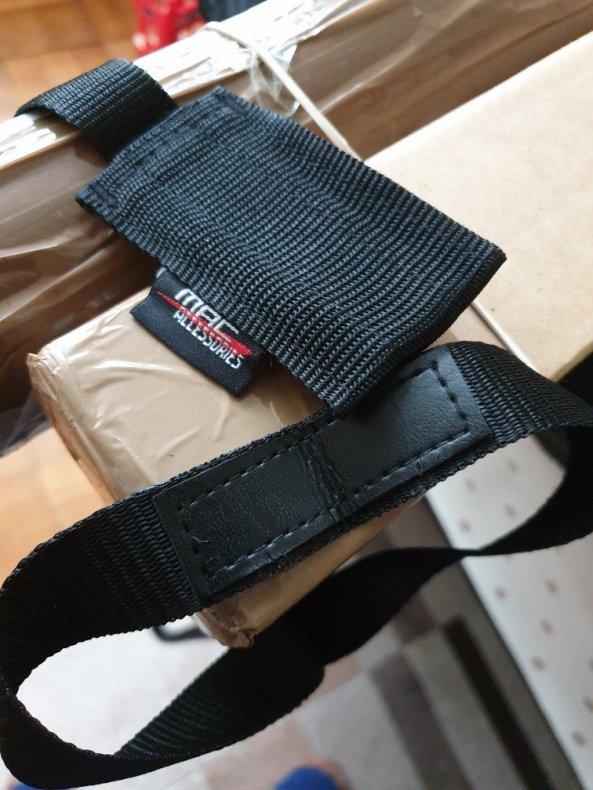
example of a webbing stringer

Example of a webbing stringer with a small stitched in pad

string or rope stringer pad

Example of a string or rope stringer pad which is pretty smooth

So this is where the tip comes in.
You can use a piece of something like slip-A-grip to go over the sewn in grip. You might recall I wrote an article on this stuff ages back title Don’t lose your grip for cheap arrow pullers etc. It is a open weave material with a rubber or plastic coating which offers the user greater traction. I use it a lot in my motorhome for the cupboard shelves to plates and stuff moving round. You can buy it from pound shops or any decent super market, I got mine from Lakeland.
Using this material offers a greater grip on the limb, so the stringer is less likely to slip when under tension as you string the bow. You still have to be careful and take your time but does help a bit.
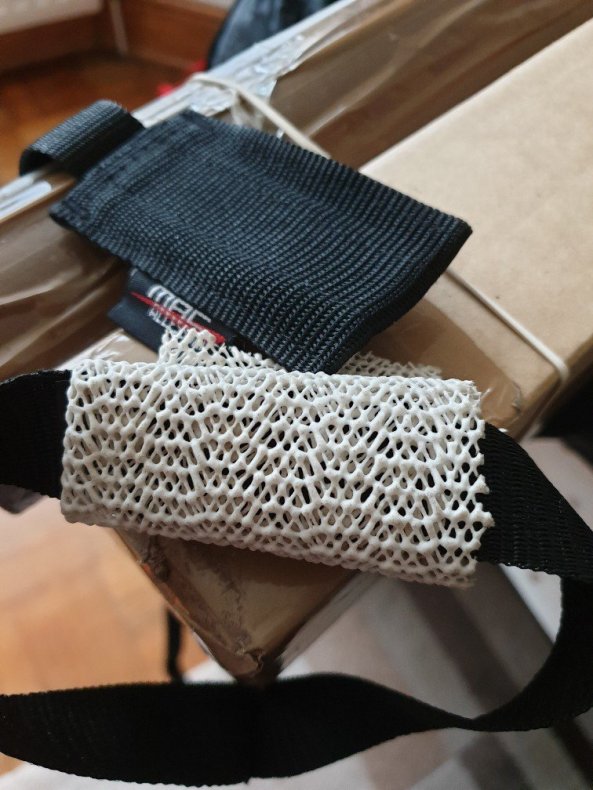
example of a webbing stringer with grip fabric

example of a webbing stringer with grip fabric

I’ve used the same material to patch up an old stringer where the grips worn off as shown in the pictures below.

Old worn stringer

I then added some grip material, securing with some waxed string so doesn’t move. I’ve used this stringer for over 8 years and for 3 years with this material on it, so I know it works. It wears out after a while but is easy to replace and I find it gives me more confidence in using the stringer as I know it is unlikely to move or slip even in wet conditions.
stringer with grip

Same stringer with grip material

I hope you find this of use and thanks for reading.
Full Draw

Why your Draw length is not the same as arrow length?

Here is a quick post following a question I’ve had asked of me “Why your Draw length is not the same as arrow length?“
Before I start though, some of the more regular readers may have noticed I’m not doing many shoot reports and instead focusing on coaching articles. This is intentional as I’ve written loads of shoot reports over the years and currently I’m not getting out to many shoots. So I’m trying to produce some archery resources or publish material that all archers will find useful.
So if you have any questions let me know. I’m working on something about target panic and hope to put that out shortly but it’s taking a while to write and get it right, or should I say useful.
So back to the question on draw length and arrow length. First things first, here is a definition or two.
Draw length – Put simply your draw length is how far you draw back the bow string to your anchor point. This is measured in inches so mine is a just under 28 inches 27 1/2 if you want to be exact.
Arrow length – Your arrow length is how long your arrow is. This is normally measured from the bottom of the groove in the arrow nock to the tip of the arrow shaft behind the point.
Your arrow length should be longer than your draw length to allow the arrow to clear the bow or arrow rest and more importantly not to come off your rest if you over draw slightly as this could be dangerous. I have to say I cringe when I see some archers draw back and their arrows come within millimetres of coming off their rest. Yes it can demonstrate very good draw consistency but it doesn’t take much to go from great consistency to accident. Especially in wet conditions or when they are at full draw and sudden a bug decides to have a munch on their arm. I’ve seen both and neither ended well.
So, if your draw is 28 inches your arrows should be over 28 inches. I’m going to offer a couple of what I hope are useful tips. Let me know what you think.
Useful tip #1 – For beginners who are still developing a sound draw and static anchor point or junior archers who are still growing, I tend to recommend them having the arrow length a couple of inches longer so if your draw length is 24 inches your arrows should be 26 inches. When the archers settle or stop growing the arrow length can be reduced.
For those of you who shoot wooden arrows.
Useful tip #2 – When I started shooting wooden arrows, all those years ago. I always made them slightly longer than needed so if the arrow snapped just behind the pile, the arrow would still be long enough to use. I could simply fit a new point to the slightly shorter arrow.
I still do as you can see in the photo below.
Rob Shooting

Rob Shooting

Measuring draw length is really easy and you can either use a measuring stick or use a mathematical  based approach. Height in inches divided by 2•5
I’m 5 feet 8 inches  so that is 68 / 2•5 = 27•2.  This provides a rough guide as in my case my draw is slightly under 28 inches.
Full Draw

Full Draw

 You can buy draw length gauges from most archery stores or alternatively I made a measuring stick from an arrow shaft, marking it up in inch bands of green and red.
Measuring Arrow

Homemade Measuring Arrow

I hope you find this useful. Thanks for reading.