From time to time your target bosses will need repair. Sometimes this is a complete rebuild, other times the boss simply needs the banding tightening. In a recent post I discussed a tip on banding bosses, in today’s article I’m going to cover a rebuild on a layered foam target boss.
These types bosses are very common on most field courses and consist of layers of thin foam with wooden sides. The foam is compressed between the wood sides and remains compressed thanks to the banding straps which run round the outside of the boss.

Finished boss
Rebuilding a boss can be a daunting prospect, but taking it slowly and steadily helps. I think the most nervous part is removing the old banding and realising there is no turning back.
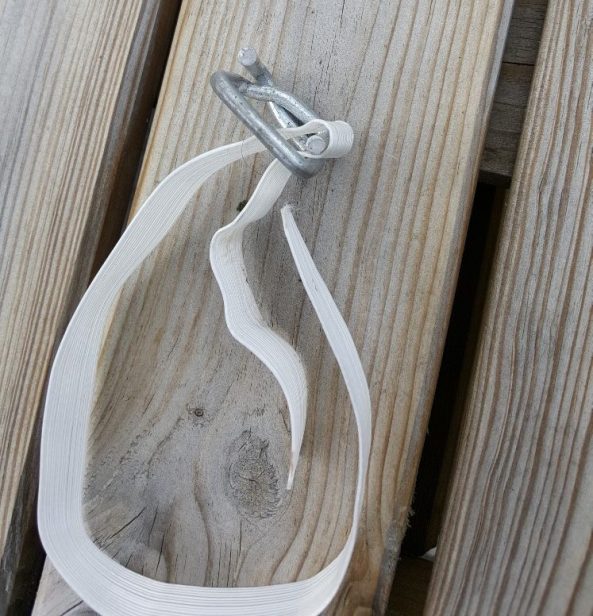
One tip – ideally you want to avoid having buckles or banding fasteners on the side of the boss facing the archers . This avoids arrows hitting them, as this both runs the risk of damaging the arrow and the banding holding the boss together. Many years ago I recall being on the practise bosses for one shoot next to a very competent compound archer who released his arrow, only to have it bounce straight back 15 yards to his feet. It had hit the metal fastenings of the banding.
We try to set them on the side or top of the boss, this means they are accessible and we can be tightened up if needed.
This boss is in pretty bad state, firstly it’s pretty old over 4 years and not been repaired recently. Also it’s only been used one way round so all the damage is one side of the form sheets. That is visible from the image below.

Not looking good
Sometimes the wood framework on the sides of the bosses needs replacing. Fortunately in this case the wood is mostly okay and should last another year or two.
I think one reason for this might be the boss is not in direct contact with the ground and instead sits on a couple of layers of polystyrene foam. This appears to have helped keep it from rotting away. The wood had also been treated with wood preservatives previously. It’s worth noting that the latest target bosses we’ve bought for the club needed wood preservative applying.
So the first step is to remove the existing banding so you can view the condition of the foam.

Side showing more damage than other side
I started this outdoors but the wind picked up so moved into the shed. The last thing you want is to have the foam blown across the field or woods. It might look comical but would be a pain.

Not in a healthy state
I removed the foam in sections which allowed me to inspect the sheets removing those that were the worse damaged.
Take care when doing this as you never know what you might find. Considering me and Sharon don’t shoot carbons it was a bit of a surprise to find a sliver of carbon about 3 mm wide and 12 cm long between the layers.

Carbon fibre sliver found in the boss.
Once all the foam has been removed and checked, I start to stack it back into a boss shape on top of one of the wooden sides. The foam from the edges of the boss nearest the frames were the least damaged, so I used these in the centre and those that had been in the centre and were still usable I moved to the sides.
I would be assembling the boss effectively on its side layering the foam sheets on top of one another, trying to ensure they were all straight and lined up. Easier said than done as I discovered some sheets (the yellow ones) were slightly smaller than the others).

So it begins with first layer
By moving the foam sheets from the sides to the centre meant the best quality foam would make up the centre of boss where most of the arrows would be hitting.

Gradually build up the layers
When I have stacked the foam I placed the other wooden side on top.
It is really worth taking your time to do this as you want to keep it straight. I ended up redoing this a couple of times to make sure the boss was reasonably square. For future I might build some form of backing board to stack them against to ensure they are stright and even.
I then used a ratchet strap on the boss to tighten it up in readiness for banding positioning it centrally initially so I could get the first couple of banding straps on.

Strap to tighten and compress foam.

Side on view
I then moved the ratchet strap to run along the sides, top and bottom. This allowed me to add the last two banding straps.
Once these were tight I returned to the first two to tighten them back up. I expected this would be necessary as the foam became more compressed.

Tightening the first banding.
You will end up with a smaller target as you removed the damaged foam. This one went from a 900 mm to an 820 mm. For this reason it’s not uncommon to work on a few bosses at a time, as you might find that out of 3 or 4 initial bosses you will end up with only 2 or 3 repaired ones
Don’t throw the old bits of foam away as you can always use them to repair and refill a bag boss. That’s my next project as I have a couple behind the shed in need of repair. Also your shed or garage floor is going to get covered in bits of foam.

Floor covered in bits
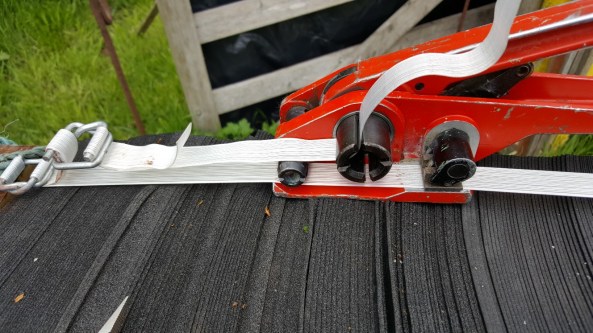
Another tip – We use these buckles for banding as it allows us to tighten the tension of the straps. It’s worth noting they can slacken up over time. The good thing is it’s easy to tighten them up.
Don’t over compress the bosses as we’ve found light poundage junior bows struggle to penetrate and arrows can bounce back. After all this you will end up with a repaired boss. Granted it may not look as pretty as a brand new one but it will hopefully work.
Finished boss
I hope you find this a useful guide to how I go about repairing bosses.
Thanks for reading.