So I’ve covered a couple of techniques so far (drawing down and blank boss shooting) in this series of posts on target panic.
So the third technique I’m going to cover here is one I’ve adopted from Jay Kidwell’s excellent book “Instinctive archery insights“. I’ve written about his book before and would advise anyone who is interested in aspects of coaching or target panic to pick up a copy. It is a very easy read and offers some great insights. The book was recommend to me by another coach and I really should type up a full literature review on it for the site.

Instinctive Archery Insights
There is a little preparation required for this approach and it is not something that I suggest you try with your normal draw weight bow. So one thing you will need is a lighter draw weight bow. I use a 16lb draw weight take down recurve with my students.
In addition to a light poundage bow, you will need a few modified target faces and a 6 sided dice. Okay, so I know this may sound a little strange, some would go as far as to say a bit far fetched, but stay with me. I have found that using a six sided dice can prove very helpful and no, I’m not talking about gambling or playing snakes and ladders. Likewise the simple modification to the target face will help promote focus.
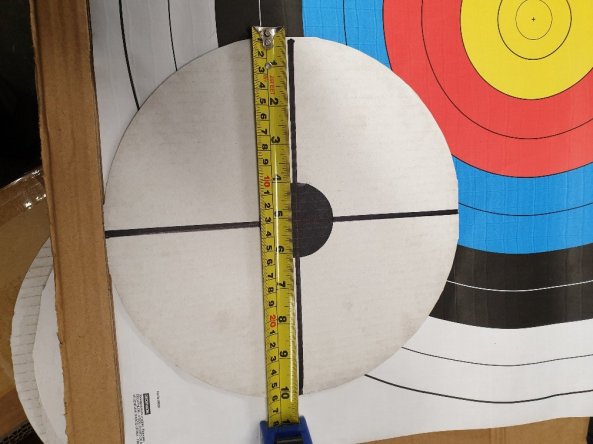
Simple target face with couple of lines added, one horizontal and the other vertical.
The objective of this technique is to help the archer overcome the urge to release as soon as they have drawn up. Instead they develop the skill, neural pathways or retrain their brains to draw up and track onto and off the target. Overcoming the desire to release immediately the arrow is on the gold or when the archer thinks its on the gold.
Anyway back to how a six sided die can help along your with archery practice.
As many of us spend hours on the range training alone, it is very easy to fall into bad habits or repeating the same pattern again and again. In some ways we want to be able to repeat good form, but in this exercise we need to include a random factor. Hence the six sided die.
In Jays book he describes how a coach or shooting buddy call out a number, to denote the number of times you draw up and track across the target. There are a couple of important facts. The archer track across the target without releasing the arrow. Secondly they do it a number of times specified randomly so don’t form subconscious patterns.
To provide the random factor when alone I used the dice.

Dice in a box
I modified the dice so there was no 1,5 or 6. This was easily done by sticking a blank label over the numbers. I wanted the die to show 1 four, 3 two’s and 2 threes. This may sound strange, but you don’t want too many higher numbers when performing the exercise as you would get fatigued, nor do you want a single occurrence.
I then housed the die in a small clear plastic tub large enough to allow the die to roll and clear enough to see the result.
So the second thing I done is modified a couple of targets by drawing lines on them through the centre, one vertically and one horizontally. When on the boss it gives the archer something to focus closely on when moving on and off the centre spot.
Remember, since you undertake these exercises multiple times, it is advisable for you to use a lighter draw weight bow.
In Jays book there are 3 exercises and rather than going into detail of how each of them work I’m going to explain how I use them and adapted them for my coaching style and students.
Step one

Me trying to remember to shoot
I’ll got through these step by step
- First, fit one of the modified target faces to the boss so you have one line horizontal and another vertical.
- Pick up you light draw weight bow and set yourself up at about 10 to 15 yards from the target boss.
- Roll the die to get your random number, lets say 3.
- Draw up and when they get to full draw and aimed / focused on the gold or in this case centre of the target, you move to the right to the edge of target and then back to the centre. Once at the centre track left, again to the edge of the target. All the time maintaining full draw whilst not releasing. That is the crucial part, not releasing.
- In this example you would pass over the centre 3 times before coming down. Right, left, right and down.
The lines on the target provide a guide for movement. The theory is you are retraining your brain to be able to draw up, centre on the target and then move off and back on without releasing. The movement to the left and right doesn’t have to be huge, ideally 3 to 4 inches at most.
The advantage of using the pizza base targets are they aren’t that large so you are tracking left and right only a little.
An alternative to this method is rather than tracking left to right, you track up and down, moving vertically through the centre. This is why there are both horizontal and vertical lines drawn on the face.
Try practising this technique for a few weeks and slowly it will help you build confidence and control.
The next step
So by this stage you have hopefully learnt to be able to draw up onto the target and move off it. A subtle development of this technique is when pass over the centre, you actually stop and hold on the centre for a moment.
From my experience these exercises work well, with the die providing a random number of reps you have to perform.
Development
When you have mastered either or both of theses techniques you can progress to a slightly different version. In this version you combine the above exercise of moving over the centre spot of the target but on the final pass you lock onto the centre and you actually release the arrow.
When I am coaching these technique with students I recommend, they don’t perform them for long periods of time. Even with using a light draw weight bow there is quite a lot of strain on muscles, not to mention the concentration required. Ideally 15- 20 minutes seems to be optimum. Any longer and it can become tedious and the students tend to lose concentration.
The other thing is to practise these techniques over a few sessions, as it will take time for you to retrain your brain into being able to draw up, move on and off target spot etc. It is not something you can do once or twice for a couple weeks and then stop. Overcoming potentially years of subconscious neurological programming takes time and effort. So give yourself time to learn these skills. It does help if you practise them.
Thanks for reading.


