Target boss repairs tip

From time to time your target bosses will be in need of repairs. We know this as we go through the process of inspecting and repairing our targets at the club. Sometimes this is a complete rebuild, other times the boss straps or banding simply needs tightening up. In the next few articles I will be providing some thoughts and advice on how I go about repairing targets.

Bit of a disclaimer here. I am no expert but I have used these techniques and found them to work, but please take care and use common sense.

For our layered foam target bosses we use these buckles for banding as it allows us to tighten the tension of the straps. It’s worth noting the straps can slacken up overtime as the foam gets shot out. The good thing is it’s easy to tighten them back up.

The only issue that can occur is if there isn’t enough banding to connect to the banding ratchet. To overcome this problem we came up with a quick solution of creating an extension strap. I can’t lay claim to coming up with this idea or technique entirely on my own and would like to thank Tony Parsons  for his help and advice.

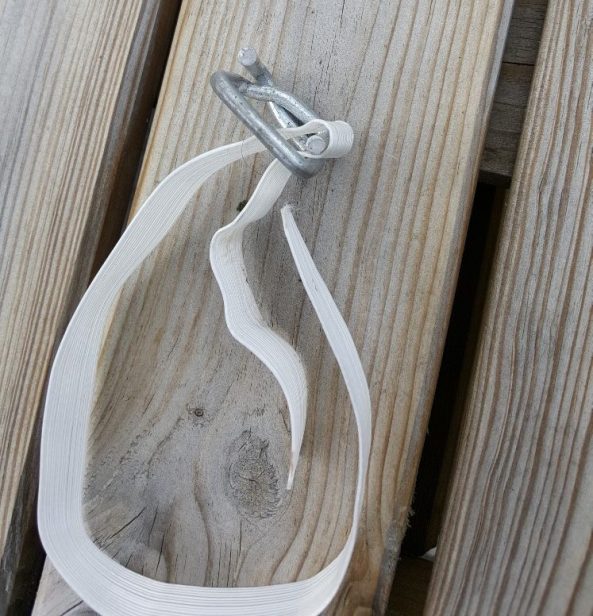
Buckle and extension strap

This is a length of about 12-14 inches with a buckle on the end. With a little luck there should be enough banding on the boss end to loop through the other side of the buckle.

You might want to use a pair of pliers to pull the end through as shown below.

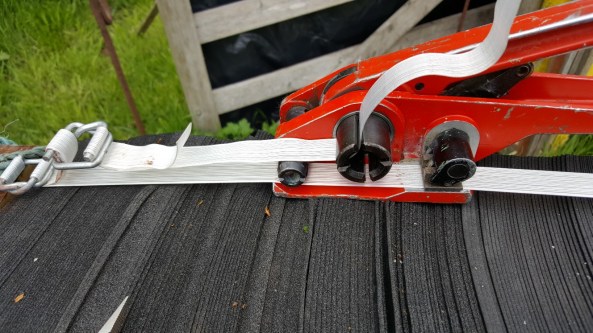
You can then use the extended length of strapping in the bander to tighten the boss straps.

Be careful with using this technique as if there is insufficient banding on the buckle it can slip off.

Another added advantage of this method and the buckles is if you are careful you can tighten the bosses in situ on the course by just taking the banding ratchet and extension length.

Don’t over compress the bosses as we’ve found light poundage junior bows struggle to penetrate and arrows can bounce back.

Any  comments or thoughts let me know.

Thanks for reading.

Safety after a storm

I know safety is not thought of as a very exciting topic for many but last weekend the country (UK)was battered by strong winds. This resulted in damage at our club woodland and has prompted this quick post.
With trees coming into leaf, thanks to a very pleasant spring I guess it was inevitable there would be some damage from the gusts.

Storm damage

This is one example of what we have seen and was directly above one shooting peg. Sadly it was not the only example with another tree falling within inches of one target peg.
We were very fortunate as we had closed the wood for shooting whilst running a work day in preparation for upcoming events.
It’s really important to check your woods for any widow makers, these being branches hung up in trees and likely to fall at any point.

More storm damage, yes the bow was fine.

Other hazards can be from branches that have already fallen and are blocking paths or targets. Look out for those trees just off pathways and routes that may have been damaged too. We have a lot of holly bushes in our wood and these tend to support falling or fallen wood. This effectively makes it’s an accident waiting to happen and we have spent a lot of time checking and clearing them.
So, can I suggest that everyone check and double check their woodland. If you find yourself in a wood during such weather take particular care and be aware of your surroundings. As I said earlier we were working in the woods setting up new targets and there were several times we heard the cracking of wood. For this reason we worked in pairs ensuring no one person was left alone and therefore vulnerable if they did fall foul of a broken branch.
We’ve conducted a brief survey on Sunday and will be checking the woodland in more depth this weekend.
Stay safe and thanks for reading
JVD Hare target face

Preparing target faces – a couple of quick tips

I thought I’d share a tip or two on preparing target faces for competitions. We are in the process of pasting up a load of faces for a couple of competitions the club is running in a few weeks. Fortunately it’s been pretty warm so they have been drying real fast.

target face

Like many other clubs we glue the target faces onto corrugated cardboard so they last longer on the day, usually using some form of  PVA glue. One thing we’ve learnt is the centre of the target or the highest scoring zone gets shot out quite quickly. To try and make the faces last longer we paste an extra layer of cardboard behind the centre to help it keep it’s strength.

Card on the back

It seems to work and helps the faces last a little longer on the day. I’ve known other clubs to paste a layer of fabric on the back to do much the same thing.

We also paint a layer of PVA over the top of the face to help waterproof it. The only problem with doing this we’ve encountered is if you get the mix of PVA to water wrong, you can end up with a slight white sheen over the faces.  So it is a bit of trial and error I’m afraid as different PVA seems to prefer different mix.

Hope this helps and thanks for reading.